 python并发编程——多线程编程 threading 协程
Python 并发编程可以分为三块:多进程编程,多线程编程,多协程编程。之前一篇文章已经讲解过了 多进程编程 multiprocessing 的用法,threading 的使用基本上和 multiprocessing 的差别不大,由于协程是共享同一个进程下的内存地址,所以无需使用 Manager/Array/Values 这种进程间通信的方法,更加简单。
本章主要介绍
- 多线程threading 的基本使用方法
- GIL锁概念
# threading 库使用
基本使用方法和 multiprocessing 一样
import threading
import time

def worker(name):
    print("线程 %s 正在运行" % name)
    time.sleep(1)

if __name__ == "__main__":
    for i in range(5):
        t = threading.Thread(target=worker, args=(i,))
        t.start() #启动线程,即让线程开始执行
2
3
4
5
6
7
8
9
10
11
# 构造方法
class threading.Thread(group=None, target=None, name=None, args=(), kwargs={}, *, daemon=None)
- group 兼容逻辑,始终设置为默认 None
- target 目标函数
- args 传入tuple参数
- kwargs 传入字典参数
- name 线程名称,默认会自动起一个
Thread-N的名字 - daemon 守护线程
# 属性 & 方法
ident 线程标识符 get_ident()
name & get_name() & setName() 获取/设置进程名
daemon & isDaemon() & setDaemon() 设置/判断 守护进程
is_alive() & isAlive() 线程是否存活
join([timeout]) 线程阻塞
start() 和 run() 启动线程
如同进程一样,线程也有两种构造方法。
a. 通过 start() 启动线程,此方法每个线程对象只能调用一次。start()会调用run()方法。
标准的run() 方法会执行 target 函数,并使用 args, kwargs参数
t = threading.Thread(target=worker, args=(i,))
t.start() #启动线程,即让线程开始执行
1
2b. 通过继承
threading.Thread的子类重写run方法实现我们上面的功能import threading import time class MyThreading(threading.Thread): def __init__(self, *args, **kwargs): super(MyThreading, self).__init__() # 有两种方法调用父类,注意self的区别 # threading.Thread.__init__(self) self.args = args def run(self): print("线程 %s 正在运行" % self.args) time.sleep(1) if __name__ == "__main__": for i in range(5): t = MyThreading(i) t.start()1
2
3
4
5
6
7
8
9
10
11
12
13
14
15
16
17或者,更加通用一点
class MyThreading(threading.Thread):
    def __init__(self, group=None, target=None, name=None,
                 args=(), kwargs=None, *, daemon=None):
        threading.Thread.__init__(self, group=None, target=None, name=None,
                 args=(), kwargs=None, daemon=None)
        self.args = args
        self.kwargs = kwargs
        self.func = target

    def run(self):
        self.func(*self.args)

if __name__ == "__main__":
    for i in range(5):
        t = MyThreading(target=worker, args=(i,))
        t.start() #启动线程,即让线程开始执行
1
2
3
4
5
6
7
8
9
10
11
12
13
14
15
16
# threading 提供的方法
threading.active_count() 当前存活的线程数目
len(threading.enumerate()) 也可以计算出相同的结果
threading.current_thread() 当前正在执行的线程对象
threading.enumerate() 当前活着的线程列表
threading.main_thread() 主线程
>> threading.enumerate())
[<_MainThread(MainThread, started 4573310400)>, <MyThreading(Thread-1, started 123145406984192)>, <MyThreading(Thread-2, started 123145412239360)>, <MyThreading(Thread-3, started 123145417494528)>, <MyThreading(Thread-4, started 123145422749696)>, <MyThreading(Thread-5, started 123145428004864)>]
>> threading.main_thread()
<_MainThread(MainThread, started 4573310400)>
1
2
3
4可以看到我们有一个主线程和程序运行中自主创建的5个子线程
# threading vs mutiprocessing
没有线程池
线程间共享全局变量,没有多进程间复杂的沟通方式
共享全局变量依旧会存在冲突的问题,使用的方法为互斥锁
Lock, RLock, Condtion, Semaphore, Event. Barrier 这一部分和 mutiprocessing一样
# threading 实例
class UsefulProxyCheck(ProxyManager, Thread):
    def __init__(self, queue, thread_name):
        ProxyManager.__init__(self)
        Thread.__init__(self, name=thread_name)

        self.queue = queue
        self.log = LogHandler('useful_proxy_check')

    def run(self):
        self.log.info("UsefulProxyCheck - {}  : start".format(self.name))
        self.db.changeTable(self.useful_proxy_queue)
        while True:
            try:
                proxy_str = self.queue.get(block=False)
            except Empty:
                self.log.info("UsefulProxyCheck - {}  : exit".format(self.name))
                break

            proxy_obj = Proxy.newProxyFromJson(proxy_str)
            proxy_obj, status = checkProxyUseful(proxy_obj)
            if status or proxy_obj.fail_count < FAIL_COUNT:
                self.db.put(proxy_obj)
                self.log.info('UsefulProxyCheck - {}  : {} validation pass'.format(self.name,
                                                                                   proxy_obj.proxy.ljust(20)))
            else:
                self.log.info('UsefulProxyCheck - {}  : {} validation fail'.format(self.name,
                                                                                   proxy_obj.proxy.ljust(20)))
                self.db.delete(proxy_obj.proxy)
            self.queue.task_done()


def doUsefulProxyCheck():
    proxy_queue = Queue()

    pm = ProxyManager()
    pm.db.changeTable(pm.useful_proxy_queue)
    for _proxy in pm.db.getAll():
        proxy_queue.put(_proxy)

    thread_list = list()
    for index in range(10):
        thread_list.append(UsefulProxyCheck(proxy_queue, "thread_%s" % index))

    for thread in thread_list:
        thread.start()

    for thread in thread_list:
        thread.join()
2
3
4
5
6
7
8
9
10
11
12
13
14
15
16
17
18
19
20
21
22
23
24
25
26
27
28
29
30
31
32
33
34
35
36
37
38
39
40
41
42
43
44
45
46
47
48
# GIL 锁
# GIL的基本概念
In CPython, the global interpreter lock, or GIL, is a mutex that prevents multiple native threads from executing Python bytecodes at once. This lock is necessary mainly because CPython’s memory management is not thread-safe. (However, since the GIL exists, other features have grown to depend on the guarantees that it enforces.)
GIL(Global Interpreter Lock),中文译为全局解释器锁。
Python 虽然是近年来非常火的一个语言,但是它并不是一个新语言,1991年第一个Python编译器诞生。那时候的计算机大多是单核CPU,也就不存在并行计算的问题。随着CPU性能的提升,单核CPU逐渐被多核CPU替代。随着而来的问题是,如何保持数据间的一致性。解决的最简单的方法是加锁,只是Python的这把锁太大了点。
GIL本质上类似操作系统的 Mutex。GIL 的功能是:在 CPython 解释器中执行的每一个 Python 线程,都会先锁住自己,以阻止别的线程执行。
# GIL的工作原理
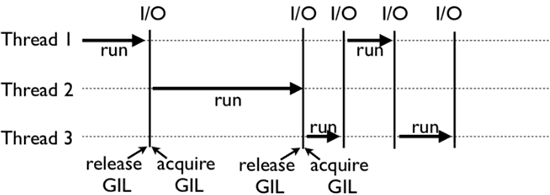
可以看到 Thread 1 和 Thread 3 并不是一次性执行完的,而是线程会主动释放。这里的原因是CPython中存在一个叫做 间隔式检查(check_interval) 的机制。CPython 解释器会轮询线程,每隔一段时间,CPython 就会强制当前线程释放GIL锁。
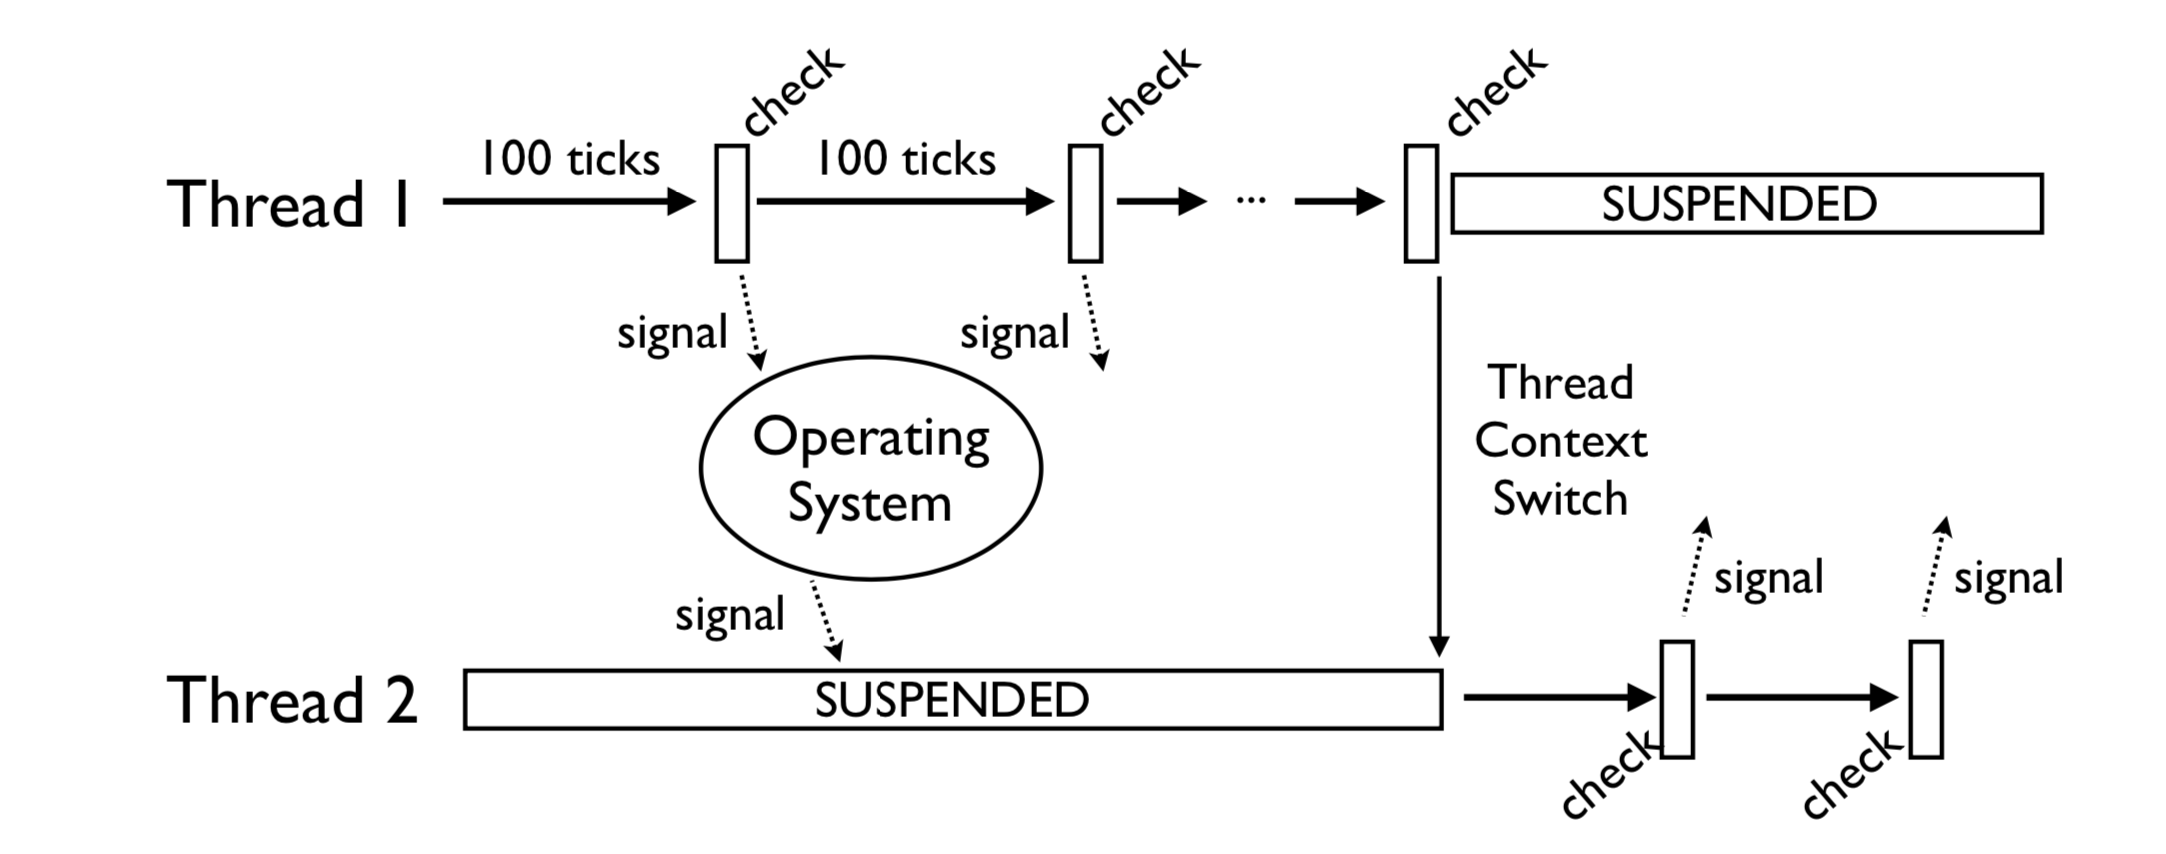
这和CPU时间片的概念一样 在Python3 中,“时间片”大致为15毫秒。
# GIL 解决方法
# 使用 multiprocessing 替代 threading
multiprocessing库的出现很大程度上是为了弥补thread库因为GIL而低效的缺陷。它完整的复制了一套thread所提供的接口方便迁移。唯一的不同就是它使用了多进程而不是多线程。每个进程有自己的独立的GIL,因此也不会出现进程之间的GIL争抢。
multiprocessing 的问题在于,其占用的资源是高于多线程的。而且由于进程间不能读取对方的地址空间,导致了多进程沟通是较为复杂的,这个额外的成本使得原本就非常复杂的多线程编程变得更加困难了点。
不过 threading 也并非是一无是处,虽然在CPU 利用率上表现的不尽人意,但是在高I/O操作的时候,多线程可以起到避免阻塞的作用。
计算密集型使用多进程,I/O密集型使用多线程或者多协程
# 改用其他编译器
使用JPython 或者 IronPython 编译器,可以解决这类问题
# 参考资料
threading--- 基于线程的并行 (opens new window)
食之无味,弃之可惜---Python threading——线程对象 (opens new window)